Tuesday, March 15, 2016

A wedding dress remodel

It's been quite a while since I stopped sewing long enough to blog about anything.  But once this project was complete, I knew I needed to stop and document this project.

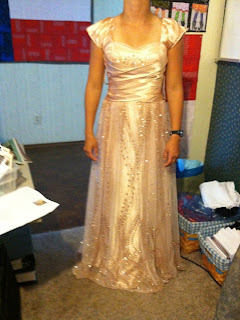
So my sweet friend called and gave me the wonderful news of her engagement.  Then mentioned the wedding was in 8 weeks.  And was there anyway she could wear her mother's dress?  Hmm I'm game to try anything, but first, I needed to know what we were dealing with. So she called her sister who put the dress on and snapped some pictures to give me an idea.  (Her mom is serving a mission out of the country, so the details are happening with her sisters help)


Sister of the bride to be wearing Mom's 40 year old dress.  

Once I knew what we had to work with, the next step was finding out what the bride to be liked style wise, so I called up my own daughter, and told her to do two things.  1) get her fitted for a corset style bra, and 2) find out what shape of skirt made the bride happy.  Once the corset was fitted, I wanted the bride to purchase it and ship it to me immediately.  This way I can put it on my mannequin along with her measurements and give me a close approximation of her body.  Did I mention the bride to be is in Utah and I am in Texas?  So off to David's bridal they went one Saturday morning.  

After her trip to the bridal shop, this is what I drew after our phone conversation
After trying on dresses, and knowing what her moms dress looked like, the bride to be decided on a natural waistline dress, with a chiffon overlay on the skirt, a satin ribbon at the waist, total lace appliqué bodice and flutter sleeves.

Let the restoration of the color begin.

Once her sister brought me the dress, we began the process of trying to bring the color back.  I swear there was a miracle happening in my bathtub.  I soaked the dress overnight in this amazing solution.  Rinsed in cold water and hung to dry.  I am thrilled with the results.  I discovered that most of the discoloration was the netting the lace was attached to, and the underdress.  Not a problem as my bride to be has wider shoulders than her mother did at this age, so I needed to make an underdress in her size.

The lace brightened up amazingly well!
The first thing that had to happen was to remove all the delicious lace off the old dress. It was very ornate and most of the beading had to be reinforced.  I spent about 4 weeks cutting the lace off and hand sewing it onto the new dress. Did you know that 40 year old chiffon looks just like modern chiffon?  The color came back perfectly! 

Finally got the flutter sleeves to work...
So I needed to learn a new skill.  The bride wanted a flowy flutter sleeve, but I knew we didn't want to add any bulk to the top and underarm sleeve.   Pinterest to the rescue!  In just a few minutes I was able to draft the style of sleeve she requested.  I love learning new techniques with the help of kind people who post directions!  I opted to make the sleeve out of two layers of chiffon, as she wanted a spring look, but without the sheer fabric that can be see through.

Its coming together...

One very happy bride
Now here's the tricky part of sewing for other people.  I know what I like, and I know what I can do, but sometimes people show up to the final fitting and demand design changes that are not part of the original plan.  Lucky for me this bride was no drama queen at all.  She was moved to tears at how beautiful her moms dress turned out.  Having a happy client makes me very happy.


Side by side comparison

So our brides to be is beyond excited,  I am pleased with how it turned out.  I just hope her mother likes what I did with her dress.   Her wedding dress ended up using all the lace and the chiffon that was on her moms dress.   The underdress was made using a satin blend and some netting to reattach the lace pieces.   The only adjustments I had to do was to pull it in 1/2 an inch on each side right above the waist.  No problem!

Saturday, December 19, 2015

A very busy week


My letter jacket patch collection for LDS teens continues to expand.  This is personal progress patches in gold and silver, both 6 inch size for a memory quilt.  The honor bee patches are 4 inch size.  The person who commissioned this job said "I was a bit of an over achiever in high school."  It's a worthy thing to accomplish multiple times.


The next order was for multiple members of the same family.  Their jackets are going to look awesome with these. Each of these is 4 inches

Friday, February 14, 2014

Personal Progress Patch

This patch is right at 4 inches round.  Can be made with either silver or gold colors, depending on which medallion she chose.


Because the well dressed LDS teenager who has a letter jacket should be able to celebrate all aspects of her life!
contact me directly threadnbutter@gmail.com

Monday, January 27, 2014

Green chili chicken enchiLasagna of death

No, I'm not usually a food blogger, heck who can remember to take pictures of each step along the way, but my sister and I were discussing the possibility of this dish, and she told me to post it here, because this is where I do my blogging.  So enjoy.

I got to thinking about freezer meals (I belong to a once month freezer meal group), and wondered if it were possible to combine some of my favorite meals.  So incorporating three of my favorite comfort foods, Sour Cream Chicken Enchiladas, Lasagna and Mormon Funeral Potatoes, at least  aspects of each one, this is what I came up with.

Green Chili Chicken EnchiLasagna of Death


The Cast of characters:
9 Lasagna Noodles (uncooked)
1 can mild green chili enchilada sauce
1 can cream of chicken soup
1 cup sour cream
1 can mild green chilies
1/2 c chicken broth
1 c shredded cheese
pepper jack cheese slices
1 1/2 c shredded chicken
1 green bell pepper
Chop bell pepper, shred chicken.  Mix soup, sauce, sour cream, green chilies with a whisk.  thin with chicken broth.  Mix 1 c shredded cheese into sauce.

Start by putting 1/2 c sauce into the bottom of a glass casserole dish.  Top with 3 lasagna noodles, rinsed (Really.  Just turn on the water and get the noodles wet)  Lay noodles on top of sauce.  Top with more sauce, 1/3 shredded chicken, 1/3 of the bell pepper and 3 slices of pepper jack cheese.  Repeat.  Don't forget to rinse your dry pasta.  Continue until you have 3 layers in your pan.  Finish with shredded cheese.  Now the tricky part...Add 1/2 cup of water to your dish.  Really.  Just pour the water along the edges of your pan.   Cover with foil and freeze.  Or preheat oven to 375, bake for 1 hour.  Remove foil last 20 minutes.  Let sit 20 minutes before serving.  

All this creamy saucy slightly spicy deliciousness in one dish.. and it tastes even better the next day

This is great for a freezer meal.  Just defrost completely and then bake as directed...

Wednesday, October 09, 2013

More Patches for the Letter Jacket

For the well dressed LDS Letterman in your life:  Another "LDS kids will understand this" patch.  I love the fact that the jacket is a personal billboard, and there are no jacket police who dictate what you can and can't put on your jacket.  I got a request form a young lady who wanted to put Moroni on her sleeve, and this is what we decided on.  What an awesome idea!


The school colors are black and red with some white. So in keeping with the theme, I opted for a black background on a layer of red.


Close up of the Moroni patch.

Kudos to this sweet young person who wants a daily reminder of who she is and what she believes in.

Shipping (domestic) is included in the price of the patch.  
For local peeps, I will also attach the patch to the jacket for a nominal fee.

contact me directly threadnbutter@gmail.com


Monday, September 10, 2012

Variation on a Theme...


I received a request for another CTR patch for a letterman jacket, this time in Black and Gold. And then another request for Red on White.   I think it turned out pretty sharp.  


I was asked to design a patch for a letterman jacket that represented achieving the rank of Eagle Scout.  I was so thrilled to do this, and very sad that I hand't thought about it when my own scouts were in high school.  Oh well!  The year in the middle of the patch is when the award was earned.

Friday, April 06, 2012

The Prom

 The dress is complete, the hair is styled.

 Matching bow tie

 waiting for her date to arrive

Sunday, April 01, 2012

Trying something new


My skill set is with the sewing machine and thread.  My oldest daughter is a very talented with yarn, but me, not so much. But sometimes a gal just has to pull out the crochet hook!  Twice a year my church holds general conference.   It is a fabulous two days of listening to the prophet and leaders of the church.  I LOOOOOOVE General Conference. I have eight hours over two days to listen and learn.  I have found that if I keep my hands busy with some fiber arts, I listen a lot better.  Makes no sense I know, but if I have yarn in my lap, I am hearing everything.  So in October and in April, I will pick up my hook.  My youngest is going off to college in a few short weeks.  She is going where there will be snow and cold, it will shock her poor little Texas body, so this time I decided to try my hand at a hat.
I am not a big yarn fan, so this is actually a repurposed t-shirt. I cut the t-shirt into 1 inch strips, connected all of my ends, pulled them tight and rolled the ball.  I then used a size N crochet hook. That was a first for me using one so big.  I'm thinking the cap turned out fine, considering I had no idea what I was doing, and just kind of made it up as I went along.  Oh yeah, I must have started over 4 times, so the pulled jersey is very forgiving.  The hat reminds me of a 1920's flapper.
Chances are this will end up in a drawer, or on the floor of her closet, but for a few minutes, I believe she will actually wear it!

Thursday, March 29, 2012

The next prom dress redo

Ignore the track tan... I needed a real body as a model!


Another prom dress makeover.   This one was a little different, it not only was strapless, but had a big gap in the back also.  
So the solution was as follows:   I took some of the very full underskirt and made it a straighter skirt.  Using the cut off fabric, I pleated a piece of fabric that almost matched the pleats on the bodice.  I then used a piece of cotton underneath, sewing the pleats down fabric to facing.  The back shoulders were made the same, without the pleats.    I secured the pleats with hand sewing.  I used a basic wedge shape for the front and the back shoulder pieces.  


As for the open area in the back, I simply made a "boob tube" using the rest of the satin and flesh colored swim suit lining.  It is worn underneath the dress.


Tuesday, March 27, 2012

Prom 2012, modest remodel


Once again, we have found that prom dress designers do not make dresses that are not sleeveless or backless.  Is there a shortage of fabric in America?  What is the deal with dressing our daughters in a little fabric as possible??  Regardless, my sweet child spent all of 20 minutes shopping for her prom dress. Bless her heart, she is a girl who takes after her mother in the shopping department.  Ok, she actually gave it 10 minutes more that I was comfortable with.  Oh well!   So this is what happens when you add a shoulder seam and a double cross over cap sleeve.  I think it's going to work!

Dang those are blurry pictures!  I promise good ones on the night of the actual dance!

Thursday, November 03, 2011

Three very happy ladies.  indulging in some shopping and project choosing.  It's quilt show time!